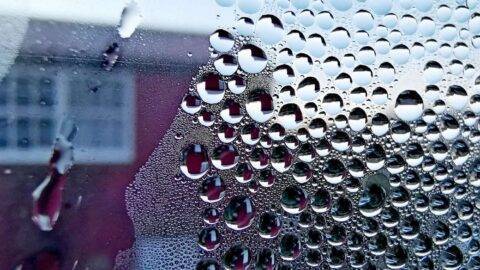
What is Condensation?Condensation is the liquification of invisible water vapours present in the air in…
Insulating Challenge: Old Solid Masonry
Old stone cottages, churches, castles or tower houses, just to name a few examples, are known to have notoriously cold walls.
One of the heads of Savills told me a few years ago that if we could crack the subject of insulating old or thick stone walls we will be market leaders as insulation suppliers for old buildings.
We have spent a few years with researching the subject, and we broke through. By that I do not only mean we have one solution. I mean we have identified every aspect and every challenge of insulating thick solid masonry and we have come up with breathable and conservation friendly solutions to meet even the highest expectations.
The industry and Richard Bacon MP has acknowledged our efforts by giving us the Build It Award 2020 in the category of Innovation in Insulation. The same innovative approach has won us the Green Home Awards in 2021 and the Design and Build Awards in 2022.
Challenges and Points to Consider When Insulating Old Solid Walls
When considering insulating a property the client has a warm and cosy building in mind. This result is achieved by tackling all of the following factors. Let's summarise them in a nutshell:
- Sorting out any moisture ingress, leak or damp problem: When certain surfaces are wet or damp they keep evaporating moisture. Evaporation does cool down the air; it is almost like having an air conditioner on all the time. Needless to say that it is very counter-productive when trying to make the building warm and cozy, therefore any known damp problem needs to be sorted out as the very first step.
- Adding thermal insulation: This is the step where one would apply a thick thermal lime render outside, or put on a thermal lime plaster in the inside. This is the step that we refer to as insulating the building.
- Minimising heat loss: Old buildings can have droughty windows, single glazing, gaps between the floor boards, missing insulation between the joists, cold bridges, etc. where heat can escape. Every building is different, but it is a good idea to look for these points and fix them to minimise heat loss.
When done right the above points do result in a warm, cozy and healthy building, no matter how old it is or how thick the solid masonry might be.
1. Sorting-out Any Dampness Problem
This point is not very relevant to newer buildings, but we have to add this step when insulating old and listed buildings. More often than not there is some sort of a moisture ingress or damp problem that needs to be addressed prior to adding the thermal insulation.
The fact is often overlooked that water is actually absorbing heat when it evaporates. And that water is "very eager" to evaporate, no matter how cold or warm it is. Subsequently, it will absorb heat from the environment (heat that one is paying for) as long as any sort of moisture is present.
Sorting out any sort of moisture ingress or damp problem is an important step of insulating an old or listed building. The importance or relevance of the moisture source against heating can be determined by the size of the evaporating surface. The bigger the evaporating surface the more heat it is absorbing:
- Damp floor: flag stones or clay tiles placed on the soil tend to be somewhat damp, and as such they can be large cooling/evaporating surfaces.
- Rising damp: When the building does not have a damp proof course the evaporation of the damp soil is extended upwards into the walls. The ticker the walls the higher damp tends to climb, and the larger the evaporating surface will be. The area of rising damp affected walls surfaces, when we add them up, can be quite large.
- Rain/driving rain/sea spray: Exposed weather side walls do absorb moisture when they are being hit by rain/sea spray frequently. When the wall is a solid wall this moisture will evaporate partially inside. This is another potentially large evaporating surface.
- Earth touching walls: When the floor in the inside is lower than outside, wet soil against the other side of the wall can push some moisture through, which will appear in the inside. This is another possible source of a constantly evaporating surface.
- Various leaks: There can be all kinds of leaks, such as leaking gutter, broken pipes, bad drainage, etc. These create a localised damp problem, therefore the size of the evaporating surface is limited to that area only.
2. Adding Thermal Insulation to a Thick Solid Masonry
Okay, so we have now an old thick solid masonry, which is dry but it needs thermal insulation to bring the property up to 21st century standards.
In doing so one can run into the following "old buildings only" factors, which require "old buildings only" solutions:
- The insulation has to breathe throughout its thickness, and perform well as an insulation the same time.
- May not cause any long-term deterioration to the timber frame
- Walls are often not straight, have dips and/or sticking out stones, and the masonry is not consistent.
- The building is listed and its appearance can not be changed, so the insulation has to be applied in the inside.
- The rooms are small and there is no space for a thick insulation.
- The masonry is exposed to the elements (it isn't rendered) and some rainwater/sea spray might still get through the soft sandstone or brickwork.
- Some parts of the building fabric has a high salinity, which tends to ruin any plaster or paint within 5-10 years.
- Other imperfections of the building fabric, which will surprise us when we are halfway through the project.
External thermal lime renders
Where it is possible to do so insulating the building externally can be the cheaper and more efficient option, for the following reasons:
- The most important benefit of adding an insulating lime render externally is that heating the building will warm up the masonry too (the masonry being inside the insulation), and the warm masonry will radiate heat for many-many hours after the heating is turned off.
- By allowing the masonry to warm up throughout, humidity from the air will not condense on cold surfaces or inside the capillaries of a cold masonry, resulting in a very healthy masonry and a very healthy living environment.
- Cracks and gaps in the pointing, or any sort of leak through the masonry, are sorted out as part of the work,
- Cold bridges are typically easier to cover externally,
- The rule of "the thicker the insulation the warmer the building" is true! If the room is small to begin with, one might not want to take away another three-four inches by adding thick thermal lime plasters inside. A good thermal render outside saves space in the inside.
This is how we do it:
- It's best to start with stripping the masonry to bare brick or bare stone, and doing any consolidation, filling gaps, etc to make sure we have a stable and solid wall to render.
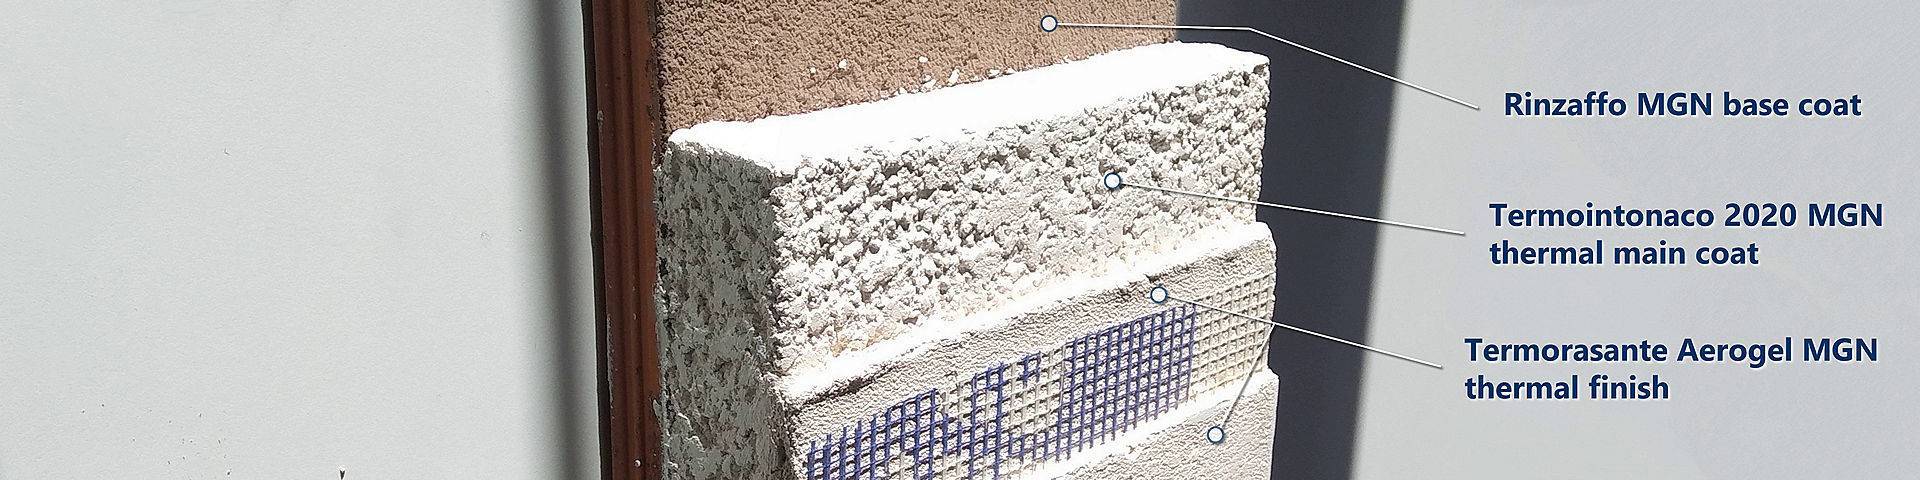
- Base coat: We apply a 1cm coat of MGN Rinzaffo, the award winning Roman salt and moisture resistant, but breathable lime base coat. It has two functions: 1) to prevent any rainwater from seeping through and into the solid masonry, protecting the inside, 2) to prevent salts from migrating into the plaster, from a salty masonry. Typically, by using this base coat we can quadruple the service life of the render.
- Thermal coat: The next step is to start applying the thermal lime render, coat by coat, until the desired thickness is achieved. Depending on the aimed thermal performance two-four inches thickness should be applied. For external application we use thermal lime renders with mineral aggregates only(!), such as the Termointonaco 2020, or the MGN Calciterm. (There are different types of thermal lime renders on the market, but almost all of them contain organic aggregates, such as hemp, cork, rice peel, etc. Organic aggregates make the render somewhat sensitive to moisture, so we typically use them internally, on completely dry walls.)
- (Optional) Heat reflective lime coat: When particularly high thermal performance is required we can add 2x5mm of the award winning AeroGel-lime thermal/reflective coat, which would bring the thermal performance of the render to a whole new level. Three inches of thermal render with the AeroGel coat performs just as good as Kingspan or Celotex type of foam insulation of the same thickness.
- Protective finish: The thermal render needs a breathable lime finish, which provides sufficient protection from the elements.
Internal Thermal Insulation
When the building is listed and the appearance can not be changed, or we simply love the stone/brick look of the building, it can be insulated from the inside.
Doing so has the following benefits:
- No scaffolding will be needed, which can be a considerable expense
- Due to the award winning AeroGel insulation technology great insulation can be achieved without having to add air gaps or considerable thickness.
- When done right, the insulation will have a longer service life, because it is not exposed to the elements.
This is how we do it:
- It's best to start with stripping the masonry to bare brick or bare stone, and doing any consolidation, filling gaps, etc to make sure we have a stable and solid wall to work with.
- Base coat: We apply a 1cm coat of MGN Rinzaffo, the award winning Roman salt and moisture resistant, but breathable lime base coat. It has functions: 1) to prevent salts from migrating into the plaster, from a salty masonry, 2) to protect the plaster from any imperfections, such as unsolved rising damp, sideways penetration, unknown leaks, "mystery damp", etc. Typically, by using this base coat we can quadruple the service life of the render.
- Thermal coat: The next step is to start applying the thermal lime plaster, coat by coat, until the desired thickness is achieved. Depending on the space we are happy to sacrifice, or the aimed thermal performance, one-three inches thickness should be applied. On walls with known damp or salinity problems we like to use thermal plasters with mineral aggregates, such as the Termointonaco 2020, or the MGN Calciterm. On perfectly dry walls thermal plasters with organic aggregates can also be used, such as the hemp-lime MGN Canapaterm.
- (Optional) Heat reflective lime coat: When particularly high thermal performance is required we can add 2x5mm of the award winning AeroGel-lime thermal/reflective coat, which would bring the thermal performance of the insulation to a whole new level.
- (Optional) Space saving insulation: When great thermal insulation is required but there is no space for its thickness, one can apply less than one inch of the thermal lime plaster (#3), and then apply 2x5mm of the award winning AeroGel-lime thermal/reflective coat (#4). This would provide great thermal insulation with a total thickness of about 1 - 1.5 inches.
- Lime finish: Just as any breathable lime plaster, it will be finished with a lime finishing plaster. We like to use the Rasante B40, but practically any lime finish can be applied before decorating the walls.
3. Minimising heat loss
This is another point that might not be a problem in a newer building, but there are a number of typical ways heat can escape in an old or listed building.
Every building is different, therefore it is a good idea to begin any sort of insulating work with a thermal imaging survey that would show property owners where they are losing heat. Thermal imaging is also a useful tool to show any damp problems, as discussed above.
More often than not property owners are aware of the heat loss, and where it occurs, because these places are cold, draughty, have condensation problems, etc. Quite a few of these are solved by simply insulting the building, including these spots. But there might be other sources of heat loss too. The most common ones to look for in an old building are:
- Draughty windows and doors
- Cracks in the doors or windows/door frames and window frames
- Single glazing
- Uninsulated solid floors
- Cold draft coming up from the subfloor area/uninsulated timber floor
- Uninsulated ceiling/draughty roof space
- Cracks in the walls/gaps between the timber frame an the infill
- Installed ventilation systems, such as PIV, with no mechanical heat recovery
These can be sorted out quite easily, with the benefit of maximising the efficiency of the heating one is paying for.
Summary
Old buildings, and thick solid walls can be insulated just as well as new buildings.
This requires somewhat different skills and a good understanding of how old buildings work. But the technology, skills and materials are available and there is no reason why old buildings with thick solid walls couldn't be just as warm and cozy as modern homes.
Related Posts