Replastering cob walls present specific challenges during renovation. Some of the important factors that need to be taken into account during cob wall replastering and renovation, are:
Dampness: cob and earth materials being extremely porous, they are subject to to multiple moisture sources, the most common ones being wind-driven rain and rising damp. These walls, to function as they intended, natively have to contain a certain amount of moisture. Due to the considerable thickness of some cob walls, they can accumulate a lot of moisture.
Salts: being primarily made of compacted subsoil, cob walls often contain a large amount of ground salts - significantly more salts than their brick and stone wall counterparts. This is an important technical point as salts can cause significantly more problems during renovation than dampness, taking dampness related challenges to a whole new level.
Structural integrity: being made of earthy materials, cob walls can start crumbling or develop structural integrity problems especially if they have been renovated with incorrect / non-breathable building materials. As a result, cob walls might also need mechanical or structural consolidation as part of their renovation.
Although water can cause damages to lime plasters through flooding, longstanding water ingress or frost, in the vast majority of cases, clean rainwater evaporates without a trace without causing any damages. Thus, dampness caused by clean fresh water is fully reversible.
The real problem, however, is when dampness is combined with minerals or salts. In the presence of salts everything changes. Salts are hard, solid minerals that in the presence of water temporarily go liquid. However, when humidity evaporates the salts re-crystallize and expand in volume 5-10 times. The crystallization or mechanical expansion of salt crystalsis what makes old masonries or plasters crumble, salts being responsible for far more damages than water ingress and frost. This is a very important technical point that needs to be understood.
It's not moisture that damages old buildings or the plastering. It's the salts.
Crystallizing salts under the microscope: the primary cause of masonry decay
On real buildings the effect of salts can be very difficult to assess, as dissolved salts become invisible to the eye and touch, only dampness being obviously present. However, under controlled laboratory conditions the effect of salts can be easily demonstrated, measured and understood.
Here is a lab experiment: when two identical bricks - one salty, the other one not - have been subjected to high air humidity variations for an extended period of time, the salty brick has crumbled badly while the non-salty brick stayed completely intact in a high humidity environment.
So salts are the real problem, however it's water that carries them everywhere, contributing to their damaging effects.
Research experiment: salty bricks crumble, non-salty ones stay intact
In cob walls, salts can be present from several sources:
The cob itself: cob, a natural soil-based building material, natively contains many minerals including ground salts.
From rising damp: porous masonries draw up moisture and salts from the ground over time. As the building ages an increasing quantity of salts are being depositing into the masonry.
From chimneys: traditional walls contain chimneys. Chimney soot contains a high concentration of salts (sulphates) which migrate into the wall fabric and plaster - a known problem for chimney walls. Even if a chimney has been decommissioned years or decades ago, the soot still stays in the fabric, attracting humidity under the right conditions. Hence, the effect of chimney salts must be taken into consideration.
From cement: cement as a building material contains many additives. One of these additives is gypsum, which is a salt (sulphates), which acts as a retardant, keeping cement plasters workable for longer. Applying cement plasters on old walls also introduces salts in the fabric, contributing to its crumbling and long-term deterioration.
Due to the combined effect of multiple salt sources, applying a lime plaster on a cob wall can result in a relatively short life expectancy of these lime plasters, these acting sacrificially. In the presence of very high salt content of the cob, salts can keep the lime plaster permanently damp, preventing the lime plastering to dry. This can be a major problem in some renovation projects.
Addressing the Problem of Dampness & Salts in Cob Walls
Dealing with high humidity and the destructive effect of salts requires special lime plasters. These are ancient plaster mixes initially used by the Phoenicians and Greeks, then rediscovered and perfected by the Romans throughout the centuries. Being outstanding architects and builders, the Romans have observed that adding to lime certain volcanic sands and ashes (also known as natural pozzolans - highly porous and breathable lava materials), these can significantly alter the properties of lime while retaining its breathability.
Through the skilful use of different types of volcanic sands and ashes, the Romans have created many types of lime mortars with outstanding properties - some of them becoming waterproof or able to set underwater, or becoming highly resistant to salts resisting seawater.
These volcanic lime mortars have been extensively used by the Romans in very demanding environments including sewers, ports, spas and aqueducts and they have survived for many centuries. They have also been widely used in Venice, as they perform extremely well in the humid and aggressive environment of the Venetian lagoon.
Volcanic lava sand (volcanic pozzolan) under the microscope: reveals a highly porous, breathable pore structure
NHL mortars - a mix of lime and clay - require higher firing temperatures than normal (air) limes to ensure proper reaction between ingredients. The higher temperatures partially close off the pores, making NHL plasters less breathable than air limes. As a result, NHL plasters gain water resistance at the expense of breathability.
Ancient Roman mortars combine lime and a variety of volcanic sands and ashes. These are mixed to the lime at room temperature (without heat) as the volcanic sands and ashes have already been pre-burnt by the volcano. The lack of industrial heating retains the open pore structure of the mix resulting in high breathability. Furthermore, in Rinzaffo MGN, a portion of conventional sand is replaced with volcanic sands. Unlike dense quartz sands resembling glass, being impermeable to water vapours, volcanic sands are highly porous, contributing to the plaster's breathability.
The skilful combination of lime and volcanic ingredients can make these plasters highly resistant to dampness and salts, resulting in outstanding performance and longevity in damp and salty environments.
The commercially available material today is the Rinzaffo MGN lime plaster. It comes in 25 kg bags with all necessary ingredients pre-mixed, requiring only clean tap water. Once it hardens it becomes waterproof, extremely resistantto all salts (chlorides, nitrates, sulphates), yet thanks to its porous volcanic lava ingredients, it stays breathable allowing the wall fabric to breathe.
This plaster - depending on where it is used - performs several important functions:
Liquid moisture barrier: as a result of its special pore structure, this plaster acts as a selective moisture barrier, stopping liquid water while allowing the passage of vapours.
Salt barrier: this plaster acts a salt barrier, protecting subsequent lime coats from premature decay caused by dampness and salts. As a result the longevity of lime plastering increases by about 10 times.
Consolidates mechanically the frail, crumbly masonry, providing a solid, dry, breathable surface to build on.
Internal humidity regulator: by stopping liquid water it regulates the internal humidity, creating a drier, healthier, warmer, more comfortable climate.
Improves the performance of thermal insulation by keeping any thermal plaster applied on it dry. A dry insulation performs much better thermally than a moist or damp insulation.
This lime plaster is made exclusively of natural materials. It contains no cement, no chemicals nor additives. All prime materials as well as the final product is certified.
Thus, the Rinzaffo MGN plaster is a lime plaster that acts as breathable water and salt filter. Due to its small pores it blocks liquid water. Due to its open pore structure allows the wall fabric to breathe. Having no salt content of its own, it does not introduce salts into the masonry. Being waterproof, it becomes impervious to salt penetration and crystallization, resulting in an extremely long service life even in very demanding and damp environments (e.g. basements).
Recommended Lime Replastering Schedule
The recommended lime plastering schedule for cob walls which "ticks all boxes" - breathability, water and salt resistance, moisture control, long life expectancy - consists of the application of the following plaster coats:
Base coat: the Rinzaffo MGN Roman salt-resistant lime base coat
Main coat: a main lime plaster coat, which can be a regular or thermal lime coat
Finishing coat (optional): a good quality lime finish
This concept is very similar to the current lime renovation concept, except it extends that by adding the Roman waterproof, salt-resistant base coat to the plastering schedule. This Roman coat has a very important role in the background, protecting the other lime coats (the second and finishing coats) from early decay from the combined effect of humidity and salts. Being a heritage-friendly material, it is extensively used in one of the most historic cities of the world - Venice - a World Heritage Site.
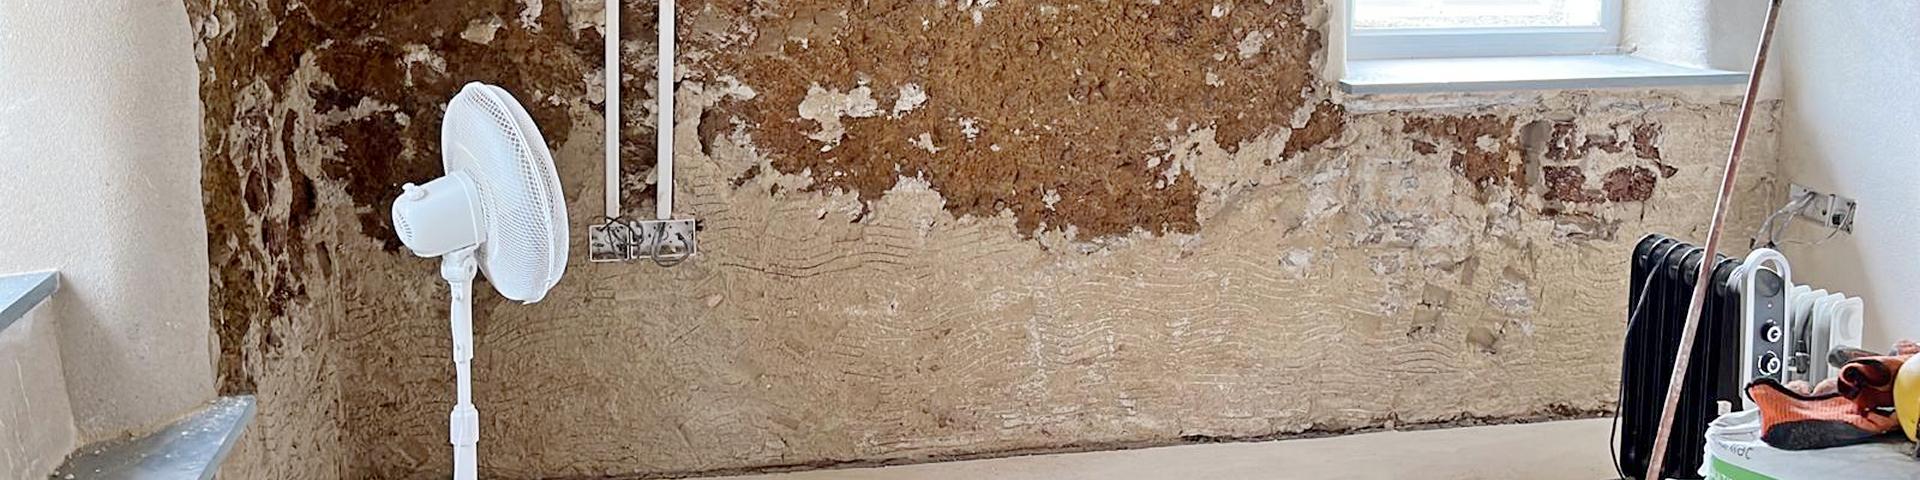
Here is a real-life renovation example of an old farm house with cob walls, from Devon, UK.
The necessary materials for the renovation concept are detailed below.
Recommended Products
Here are the typical recommended materials/ products for this solution. Other product variations are possible as we have different types of plasters and paints, depending on your needs or application. Please get in touch to discuss additional options.
[15-20 mm] ABOVE GROUND: Lime base coat, applied as:
█ [5-15 mm] Levelling / Repair: level, repair and point uneven walls first. The material consumption here can vary, depending on substrate condition. Very uneven walls (e.g. after cement plaster removal) can take up more material.
█ [10 mm] Protective base coat: apply a 10 mm coat.
[25-30 mm] UNDER GROUND: Lime waterproofing coat or for very damp wall sections, applied as:
█ [5-15 mm] Levelling / Repair: level, repair and point uneven walls first. The material consumption here can vary, depending on substrate condition. Very uneven walls (e.g. after cement plaster removal) can take up more material.
█ [10 mm] Waterproofing coat 1: apply a first 10 mm coat.
░ [Paint] Apply 2 or 3 coats of smooth or textured breathable lime paint.
Plaster Application
Here are some key application points about the application of each plaster, as well as links to the full application guides. Please have your plasterer read / watch the application instructions below before applying the products. If any questions, please contact us, happy to help.
Here are several critical points—highlighted in red for emphasis—that MUST be followed to ensure the correct application of this plaster.
Coat thickness: the thickness of the base coat MUST be adapted to the (moisture and physical) condition of the wall fabric. Moderately damp walls require less thickness, very damp walls need more thickness. The correct coat thickness can be achieved the easiest the following way:
Repair, point and level (dub out) the walls first with the Rinzaffo MGN to have a more or less level wall surface. This might take 5-10 mm or more material (e.g. for uneven stone walls), depending on the condition of the fabric. Let it dry, then:
Apply a min 10 mm (in 1 coat) for above ground level walls. Apply min 20 mm thickness (in 2 coats) for underground or extremely damp or salty walls. embedding a 10 x 10 mm fibreglass mesh between the coats – a standard practice in the industry.
Close all pores, no matter how small. Treat and apply this plaster as a tanking-grade material, NOT as a parge coat. Cover the whole wall surface thoroughlyleaving no holes or gaps behind, no matter how small. Smoothen the surface, then give it a light key with a damp brush. Do not cut into the material.
Watch for dark patches after drying: damp underlying wall sections evaporate out a lot of moisture, which result in dark areas or patches as a result of surface condensation. Reinforce dark areas with extra material by applying an extra coat over these darker areas only. You can carry on with the next coat right away.
– – – – –
Clean the masonry: the plaster must be applied on a cleaned and uniformly wet substrate. All crumbling and loose parts must be removed by brushing so the masonry is free of dust, salts and oils. If possible, also wash the walls with a pressure washer; this will clean and wet the walls in one go. Close larger holes with lime mortar and pieces of bricks.
Must be the first coat: the Rinzaffo MGN plaster must be the first coat on any wall. It should not be applied on top of other parge coats or plasters because when those fail the performance of the Roman base coat will also likely to be affected.
Cement backgrounds: the Rinzaffo MGN base coat can be applied and will bond well to cementicios backgrounds. The removal of cement plasters is recommended for the vast majority of cases to restore the breathability of the wall fabric. However, in some (rare) cases, when the removal of cement would be too invasive, too costly or would not beneficial the underlying masonry, if the cement backing is stable, the Rinzaffo MGN can be applied over it for waterproofing purposes (e.g. to waterproof cement floor bases).
Salt-inhibitors or PVA bonding agents are NOT needed and should not be used before the application of this plaster. This natural lime plaster bonds very well on its own.
Masonry paints should be removed (which occasionally can be challenging) so the plaster can firmly adhere to the underlying stones or bricks. Remove at least 50% of the existing paint – the more is removed, the better.
Mixing: mix the material with clean tap water only without adding anything else (no other material or additive), until a homogenous, creamy-consistency mix is obtained.
IMPORTANT: Dry to wet mixing: plasters with hydraulic ingredients should always be mixed from dry to wet (workable) state. Add your powder to a bit of water, start mixing and gradually add more water till the right consistency is reached. This is the right way. Mixing the other way – wet to dry mixing – by starting with lots of water then gradually adding powder to the right consistency, is incorrect. Reason: excessive wetting weakens the plaster, alters its hydraulic set resulting in less performant, more friable and shorter lasting plasters.
Wet the wall fabric abundantlybefore applying the plaster, as well as in-between each subsequent coat. Lime plasters need moisture as they set slowly in a damp environment. If the walls are already damp, there is no need to wait to become drier, you can proceed with the application of this plaster.
Level uneven surface first: very uneven walls (e.g. stone walls or crumbling old brick walls) are recommended to be patched up and levelled first before the application of a continuous coat, to ensure the consistency and required thickness of the base coat.
Application: apply the plaster in 10 mm coats.
Light key: give the plaster a light key using a wet brush. Do not cut into the material with the edge of a trowel.
Additional coats can be applied in further 10 mm increments. Use an embedded fibreglass mesh for extra reinforcement over the recommended thickness.
Drying time: the plaster dries quite quickly, typically in 1-2 days, depending on ambient conditions. Once it has hardened, the next coat can be applied.
Application conditions: ambient and wall temperatures must be between +5 to +30°C during application. Surfaces should be protected from rain and humidity until they have completely dried (approx. 3 – 10 days depending on weather conditions).
Clean the masonry: the plaster must be applied on a cleaned and uniformly wet substrate. All crumbling and loose parts must be removed by brushing so the masonry is free of dust, salts and oils. If possible, also wash the walls with a pressure washer; this will clean and wet the walls in one go. Close larger holes with lime mortar and pieces of bricks.
Mixing: mix the material with clean tap water only without adding anything else (no other material or additive), until a homogenous, creamy-consistency mix is obtained.
IMPORTANT: Dry to wet mixing: plasters with hydraulic ingredients should always be mixed from dry to wet (workable) state. Add your powder to a bit of water, start mixing and gradually add more water till the right consistency is reached. This is the right way. Mixing the other way – wet to dry mixing – by starting with lots of water then gradually adding powder to the right consistency, is incorrect. Reason: excessive wetting weakens the plaster, alters its hydraulic set resulting in less performant, more friable and shorter lasting plasters.
Application: apply the plaster in 10 mm coats.
Recommended thickness: min recommended thickness for interior walls is 15 mm, for external walls is 20 mm.
Additional coats can be applied in further 10 mm increments. Use an embedded fibreglass mesh for extra reinforcement over the recommended thickness.
Finish options: main lime coats can be optionally left without finishing. To have a finished surface any MGN finish can be applied: Calcina Fine MGN (white lime finish), Intonachino Arenino MGN (coloured lime finish) or Marmorino MGN (Venetian Marmorino finish).
Painting: as this is a breathable lime plaster, wall surfaces should be painted with a breathable mineral paint. Wallpapers and modern emulsion petrol-based paints, with no or limited breathability, should be avoided.
Application conditions: ambient and wall temperatures must be between +5 to +30°C during application. Surfaces should be protected from rain and humidity until they have completely dried (approx. 3 – 10 days depending on weather conditions).
Mixing: mix the material with clean tap water only without adding anything else (no other material or additive), until a homogenous, creamy-consistency mix is obtained.
IMPORTANT: Dry to wet mixing: plasters with hydraulic ingredients should always be mixed from dry to wet (workable) state. Add your powder to a bit of water, start mixing and gradually add more water till the right consistency is reached. This is the right way. Mixing the other way – wet to dry mixing – by starting with lots of water then gradually adding powder to the right consistency, is incorrect. Reason: excessive wetting weakens the plaster, alters its hydraulic set resulting in less performant, more friable and shorter lasting plasters.
Recommended thickness of the finish: 3-4 mm. For best results, the finish should be applied in two “half-coats” of 2 mm each, with a fine 3-4 mm fibreglass mesh embedded in-between. The mesh makes the finish more flexible, minimizing the appearance of fine cracks.
Various textured finishes can be achieved, depending on the finishing technique used:
Coarse finish: by finishing the surface with a sponge or wooden trowel.
Smooth finish: by using a stainless steel trowel, compressing and smoothing the semi-dry surface, the sand granules are pushed into the material, resulting in a smooth finish.
Washed finish: by finishing the surface with a sponge trowel. After the surface has hardened, the surface is washed with water and blotted with a sponge to bring out the aggregate, its specific texture and colour.
Painting: as this is a breathable lime plaster, wall surfaces should be painted with a breathable mineral paint. Wallpapers and modern emulsion petrol-based paints, with no or limited breathability, should be avoided.
Application conditions: ambient and wall temperatures must be between +5 to +30°C during application. Surfaces should be protected from rain and humidity until they have completely dried (approx. 3 – 10 days depending on weather conditions).
Completed Projects
Here are some of our projects using this solution:
Most of the time the presence of salts is a more serious problem to old masonries than water. Understanding the type and concentration of salts in the masonry can help one to better understand the source and nature of moisture that is affecting the building. Here are some photos about the salt tests we perform on site.
Overcoming replastering challenges and dampness problems of a 250-year old farm house with thick cob walls after the applied traditional lime plaster failed to dry.
More Information
Here are some related pages with additional technical information, giving you a more in-depth understanding of this topic.
If you have any questions about a project, a problem, a solution, or any of our plasters - please get in touch.
We understand that each project is unique. Using the contact form below feel free to ask us any questions. Give us as much detail as you can about your project so we can get back to you with more relevant answers.