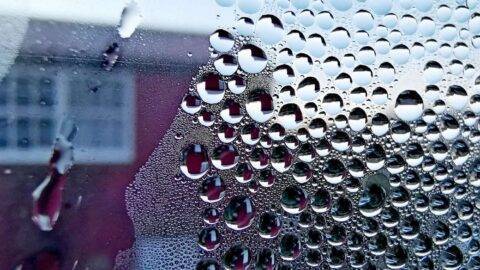
What is Condensation?Condensation is the liquification of invisible water vapours present in the air in…
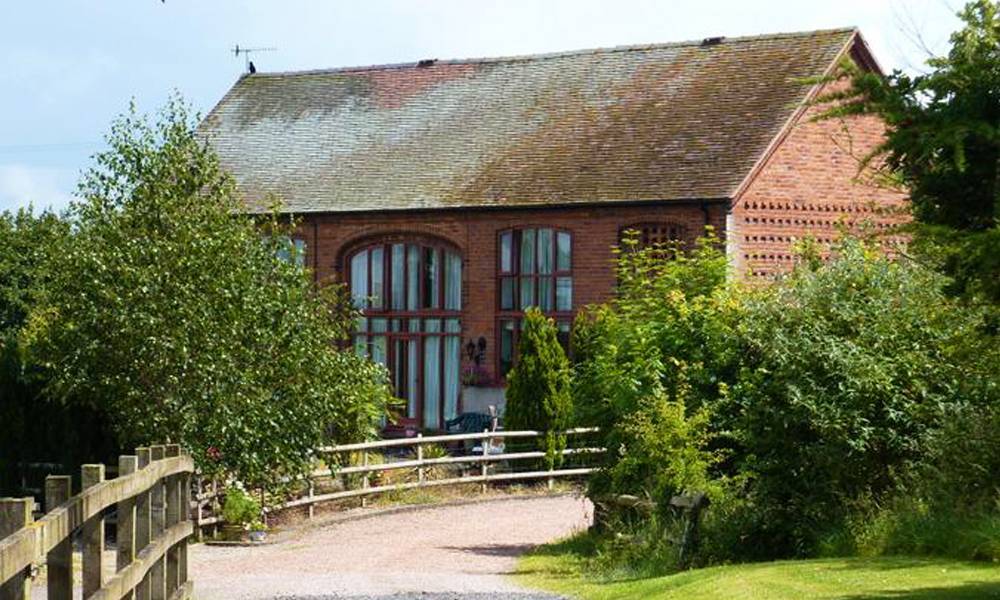
Converting a Barn – Costly Mistakes
This article was written for those who seriously consider converting a barn, or those who intend to renovate or extend an already converted barn.
We are surveyors and as such we often come in when there are problems with the building and a lasting renovation concept is required. In surveying such properties we have gained experience with the peculiarities of barn conversions and I would like to write down the lessons we have learnt.
Peculiarities of Converting a Barn - Repurposing
The key to understanding those things that could go wrong lies in understanding what purpose did a barn serve versus the purpose of a home.
A barn is an agricultural building. Typically, it was built and used for keeping livestock and for storage, and as such an old barn is a very simple structure. Animals didn't need proper foundations, floors, cavity walls, insulation, etc. They didn't object when the place was droughty, when cracks appeared, or walls were wet and radiated cold, etc.
There is a sizeable gap between the comfort level required for animals and our 21st century standards of what we expect from a modern home.
Here is the punchline: This gap is there by design. A barn was built to be a barn, which means that it was designed and built to low standards. This is what we will have to overcome when converting it to a family home.
Costly Insufficiencies of a Typical Barn Conversion
When reading about the steps of converting a barn these are the typical ones - and they are correct:
- Arrange a mortgage/finances
- Find barn
- Carefully plan a budget
- Surveys
- Purchase property
- Find an architect
- Design (also fine-tune the budget to include specific labour and materials)
- Planning permission
- Contact building control/Regulations
- Apply for services
- Contract to tender
- Organise warranty and insurance
- Start on site
- Structural fixes (repairing external walls/timber beams etc.)
- Make weathertight (roof, damp proofing, windows)
- Internal structure
- First fix (plumbing and electrics)
- Plastering
- Second fix
- Decoration and snagging
However, among these steps and all the logistics involved, a few important details are quite often missing. The above points are written bold, because these are the points where you will have to spot and bridge the difference between a barn and a lovely comfortable home.
Yes, you guessed it right, it is not as straightforward as you think.
Let's discuss them one by one:
Surveying a Barn or a Converted Barn - Salt Contamination
I have seen many barn conversion surveys and I am happy to say that surveyors do a good job pinpointing almost everything you need to know about the building. There is, however, one major factor that is almost always missing from a barn conversion survey: Salt contamination!
Let me explain: A barn is an agricultural building, on agricultural land, where walls were surrounded by all sorts of decomposing organic matter. For example, we surveyed buildings where cattle were still in the building at the time of the survey. I can't even imagine how much animal waste got into the soil there in the case of a 150 years old barn.
Such decomposing organic matter produces nitrates (a type of salt), which can climb unchecked from the soil into the building fabric in a dissolved form with moisture, because walls do not have a damp proof course.
Moisture can evaporate through the wall surface, but nitrates, just like other type of salts, do turn into crystals. As you can see it is a one way flow, rising damp is bringing moisture and salts upwards only, where salts do accumulate. Walls will have more and more nitrates in them and after 150 years you can imagine the extreme salinity of the masonry!
When surveying a barn we do measure nitrate contamination routinely. In a barn conversion it is always very high:

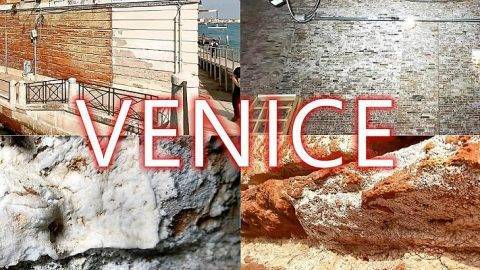
Salt efflorescence outside

Salt efflorescence inside

On site salt analysis
Why is salt contamination so important? It is very simple: such salinity is causing a very erosive environment. Not many building materials survive it. Plasters on a salty wall start crumbling just after a few months and metals do corrode within a year or two, making a new renovation project necessary.
Surveyors typically mention "there is damp". But it is an insufficient diagnosis and as you will see below it opens the door to costly mistakes in damp proofing, plastering, pointing, insulation and decoration.
Structural Fixes - Breathable Repair
The typical building fabric of an old barn is a very thick solid stone or brick masonry; and it has been built using lime mortar, which is a breathable material. Therefore, a barn is a breathable structure.
When carrying out structural repairs, such as consolidation, rebuilding certain parts of the building, replacing timber, etc. we have to restore and follow the original breathable design and use lime mortars.
Doing otherwise, such as using cement mortars, embedding timber into cement, etc. will result in moisture accumulation behind the cement and any timber encased in cement will start rotting.
Make It Watertight
This is where one would fix the roof, tidy up pointing, install new windows, a damp proof course and floors - to make sure one has a watertight and dry shell.
Sources of moisture in a barn can be divided into two main categories:
- Rainwater ingress, i.e. falling moisture (through roof leaks, bad pointing and bad or missing windows/doors, etc.)
- Soil evaporation, i.e. moisture coming up from the soil (through the floor and by rising damp)
Rainwater ingress is sorted out routinely with success, you probably won't have problems with that.
Soil evaporation is a less obvious source of moisture because it is "evaporation", i.e. moisture is moving upwards in a vapour form mainly, which is invisible. But when vapour hits cold surfaces, pressure differences or salts, it liquifies and then you do have a visible damp problem. This type of damp is one of the lesser understood subjects in the industry and as such it is often treated the wrong way (if treated at all).
Let's see what to do:
Floors
An old barn typically doesn't have a floor, and you will probably want one.
The usual way of installing a floor includes a membrane and cement screed. These components will prevent any evaporation that was happening in the past and will cause moisture to accumulate under the house. This accumulated moisture will then migrate sideways and find evaporating surfaces through the walls (if there is no damp proof course to stop it):

Installing a cement floor is fine, as long as you keep in mind that you will have to deal with the increased level of rising damp. A breathable type of floor, such as lime floor or suspended timber floor, is a better alternative, less moisture will find its way up into the walls - and don't forget, this moisture is highly contaminated with nitrates (as a result of decomposing animal waste), and you will probably want to make sure this sort of moisture does not climb inside the walls.
Walls
As mentioned earlier, a barn has been built to be a barn, and as such it did not require a damp proof course. We could put it this way: walls are damp by design.
Public Health Regulations require a building to be dry as a requirement for residential use so tackling damp problems is a mandatory element.
We have discussed that the masonry of an old barn is full with nitrates and other types of salt. So the damp problem is actually a damp and salt problem - which is significantly more difficult than treating damp only. When damp is treated successfully, salts do stay there still and their repeated crystallisation keeps ruining almost every building material that is getting in touch with the masonry.
A successful renovating schedule would include the following:
- A retrofit damp proof course solution (please note that injected chemical damp proof courses tend not to be able to saturate thick walls, such as those of a barn, so the ones you might want to consider are the electro-osmotic or the Magnetic damp proof course technologies. The electro-osmotic DPC involves carving a wire into the masonry, which tends to rust through from the presence of salts, over time. The Magnetic DPC does not use a wire so you get a magnitude longer service life.)
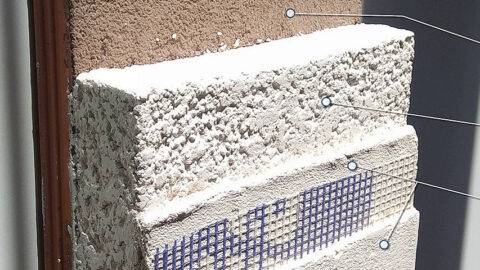
- Salt resistant base coat (lining the wall with a salt-resistant but breathable base coat, such as the MGN Rinzaffo, will protect any subsequent coat, insulation or installation from getting damaged.)
- Breathable insulating coat, such as high performance insulating lime plasters (if you are on a budget you can leave a sizeable air gap and use stud walls or secondary walls, which would carry the insulation. A stud wall is cheaper, but this version takes several inches from your living space, so it comes with a sacrifice.)
- Breathable finish and decoration.
Plastering and Decoration
After having read the above, you already have an idea of how to plaster a high salinity masonry.
To summarise it, the plaster system will have to be:
- Breathable (The original building fabric is breathable, and it has to breathe through the plaster.) Lime plasters are the right type of plaster for a barn conversion.
- Able to cope with salts and some moisture (Please note, even after successful damp proofing, salts in this amount will still introduce hygroscopic moisture, which means that salts do still attract moisture even from the air. Depending on climate conditions, salts will hold onto more or less moisture all the time. When the weather is getting dryer, they will want to let go of some moisture, when the weather is getting rainy they will attract moisture, but salts do hold onto a certain amount of moisture all the time.) We accomplish this by applying the MGN Rinzaffo salt-resistant base coat.
- Able to insulate (The best breathable alternative to modern non-breathable foam insulations is a combination of high performing thermal lime plasters. You get the same thermal performance as you would get from modern insulations, but your building will be able to breathe. If you are on a budget you can leave a sizeable air gap and use stud walls or secondary walls, which would carry the insulation. A stud wall is cheaper, but this version takes several inches from your living space, so it comes with a sacrifice.)
Based on the above we would recommend doing the following:
- Hack off the existing old plaster (wherever present).
- Clean the wall well to be free of loose debris, oils etc.
- Abundantly wet the wall surfaces before the application of the plaster.
- Salt-resistant base: Apply the Rinzaffo MGN Roman salt-resistant base coat @10-12 mm thickness on the walls.
- Do not leave any gaps on the base plaster.
- Make sure it is thoroughly worked into the solid floor
- Scratch the surface of the base plaster
- Wait until it dries. (3-4 days)
- On external walls, for adding insulation: Instead of the above lime main coat you can apply an insulating coat (e.g. Termointonaco 2020 MGN). Build it up until the desired thickness has been reached (at least 50mm recommended)
- Wait until it dries.
- For even better insulation: Wet the surface again and apply a lime thermal finish. (e.g. Termrasante AeroGel MGN) or a regular lime finish.
- Wait until it dries.
- Decorate with a breathable mineral paint. Avoid modern emulsion paints.
When you follow the above advice, your barn conversion will perform well, and stay nice for a very long time.
All the best with your project!

Related Posts